An Apron Pattern for Pregnancy and Beyond
There’s nothing quite so iconic as the waist tie apron, from Renaissance festivals to 1950’s vintage, it’s a classic silhouette.
If you want to try making a waist tie apron for the kitchen, or harvesting veggies in the yard, I’ve got you covered! This pattern is good for a confident beginner or a seasoned pro – no pattern necessary.

Materials
1 – 1 1/2 yds material
( I used scrap material from an old duvet cover so I’m guesstimating here)
Thread
Elastic ( I used 3/8″ cotton)
Tools
Sewing machine
Scissors
Pins
A ruler
Step One: Making a Pattern
A waist tie apron is essentially two things, a waist tie, and a shape to cover your middle.
They can be made in the shape of hearts, circles, squares, rectangles, trapezoids.. you name it! For this one, we’re getting real back-to-basics by making the apron a rectangle.
Apron
I want this apron to have lots of room for my expanding belly (hello third trimester) but I also want it to be functional and cute post-pregnancy. Which to me means one thing: gathering.
I could come or go on ruffles but I love a nice gathered skirt so why not make that the focus of this pattern?
To get a good dense gather on a skirt is all about getting the right ratio

I want to do a 1:2.5 ratio so to figure out how much fabric I need for the apron I’m going to measure from the side seams of my shirt across the largest part of my belly (20″) and multiply that by 2.5 (50″) and that will be the starting width for my apron.
To figure out the length I’m going to drop my cloth measuring tape from my ‘waist’ to the length I want it (24″).
I’m measuring along my side seam because I want the length to be unaffected by my belly. I’m not going to be hemming this again later, so I want it to be a good post-pregnancy length to start.
This length will cover my belly just fine for a few more months and still look nice after, so it’s mission accomplished!

Waist Tie
To figure out the waist tie I’m going to start by finding the distance around my current ‘waist’ (33″) and then I’m going to double it (66″) and round it down for simplicity’s sake (60″).
To double-check that length I went ahead and pulled out my measuring tape and extended it to 60″. It seemed fine to me so that’s the length figured.
I want the final width to be between 1″ – 1.5″ and since I’ll be doubling this over I’m just going to double the larger number to 3″ to make sure there’s room for seam allowance later, and voila!
I need my strap piece to be 3″ wide and 60″ long.

Pockets
Now for the pockets.
Everything should have pockets, especially if it’s for moms, so I’m going to be having some BIG ones. To meet in the middle between a gathering apron and a kitchen apron I’m doing two patch pockets with gathered elasticated tops.
I’m going to start by figuring out how wide I want my pocket opening (6″) and cutting a piece of scrap elastic that’s a bit bigger (7″). Then I’m going to set that aside and try not to lose it.
For the pockets I’m going 10″ wide and 14″ long. Once the pockets are finished they should be closer to 9.5″ x 11.5″ flat at the bottom edge or 6″ x 11.5″ at the top edge.
(I did warn you they were gonna be BIG).

With all the pattern pieces drafted out – it’s time to grab my material and get everything ironed, pinned, and cut!
Step Two: Material
The material I’m using is scrap from an old duvet cover that I have a lot of.
Linen, cotton, canvas, or even lightweight denim would all work well if you’re buying new – but really as long as it feels like it would make a nice apron then I wouldn’t worry about the fabric content too much.
Step Three: Sewing

First things first we’re going to set aside the pockets, the waist tie, and the elastics – and hem both short edges and one long edge of the apron’s main body.
I’m hemming by folding each edge up 1/4″ – 1/2″, ironing, and then folding it over by 1/4″ – 1/2″ again. I hate having to cut fraying threads after a wash so I don’t mind taking the time to do the double flip on my hems

Once that was all hemmed I opted to add a second line of stitching a scant 1/4″ from the edge on the front side of the apron. It wasn’t strictly necessary but it will give some extra reinforcement for when it gets tugged on by small hands.
With the hemming done it’s time to move on to the pockets!
I’m starting by ironing the top edge of the pocket down 1/2″ and then folding it down 1″, ironing again, and pinning it in place.


Now that I’ve got that all set up it’s just a quick stitch across to lock it in place.
I’m making a point to keep my line of stitching within that same 1/2″ I folded down at the beginning. Here’s what it looks like on the back and front of the pocket respectively.

Now I’m going to thread the elastic through this little tunnel I just made. I like to do this by using a safety pin on each end of the elastic, one to attach the elastic to one edge of the casing and one to push it through.
In fact, I’ve even got an extra-extra-large safety pin just for this purpose.
Once the elastic is run through I’m going to pin it so the elastic sticks out both sides about 1/2″ (remember we added that extra inch in earlier? this is why!)
It’ll look a bit like this before and after it’s pinned

I’m going to go ahead and stitch the elastic down at the edges so I don’t have to worry about it falling out later.
And now it’s time to attach the pockets, again I’m folding the pockets over by 1/2″ before ironing them flat.
For the bottom edge of the pocket I’m going to fold it over an extra time, for a little extra support, then I’m going to pin the pockets into place on the apron and sew them down.
(I want to be sure to iron toward the back of the pocket leaving the front of the pocket facing out. The front is the smooth flat side versus the side with the fold).


I’ve got the pockets placed about 3″ from the side of the apron and 3″ from the bottom of the apron. This will make sense once the apron is gathered, really.
I went ahead and did two layers of stitching for this, just for the extra peace of mind that they will be able to support a good amount of weight.

With the hems done and the pockets on we’ve got one quick step with the waist tie before we move on to gathering the apron.
For the tie, I’m just going to iron one long edge in by 1/2″ and then set it aside.
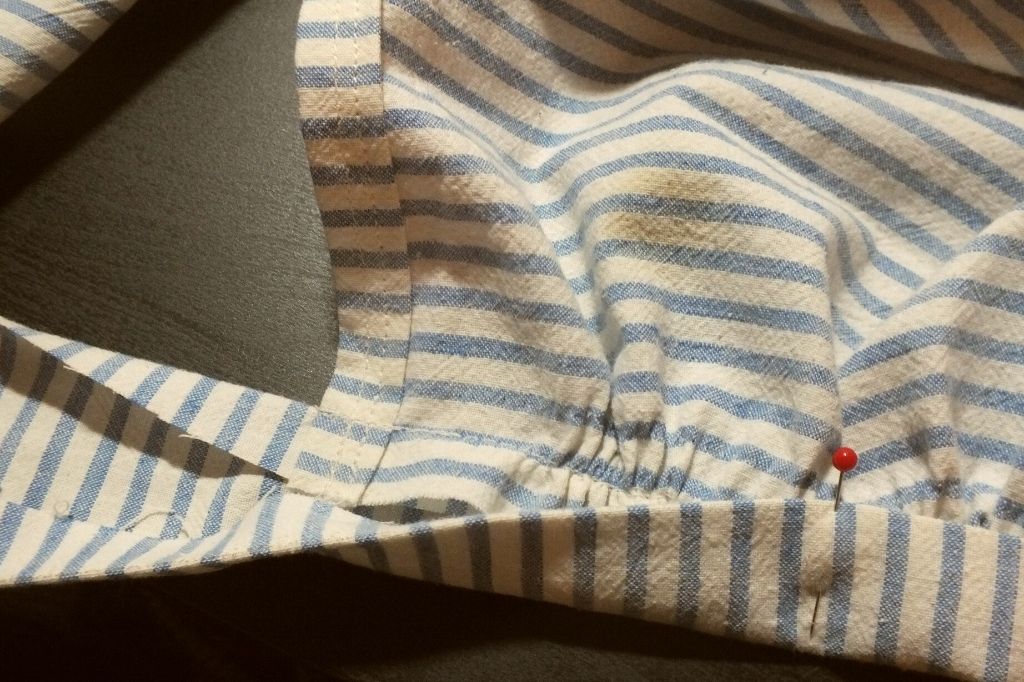
Now to gather the apron!
The easiest way to gather by machine is to set your tension high and your length long (on my machine that’s a tension of 9 and a length of 4) and then sew two lines across the top of the apron at the 5/8″ and 1″ marks. I recommend doing the 5/8″ first then the 1″.
For gathering be sure to leave a long tail on each side and don’t do a backstitch at the beginning and end to lock it in place.
Straight off the machine, and before being gathered, it should look a bit like this.

Now to gather grab just the thread from the back of the apron and hold both the top and bottom thread tight in one hand while slowly pushing the fabric toward the middle down the thread.
Repeat from the other side, inching a little this way, then inching a little the other way, until you’ve gathered the whole apron. Be careful not to pull too hard or the thread can snap and you have to start all over.
We’re aiming for about 20″ wide when we’re done.

And there we go!
It’s time to connect the tie to the apron. To center the apron on the tie we’ll fold both of them in half, mark them with a pen, and then line up our two marks.

Then, right sides together, line up the raw edge of the tie with the top edge of the apron and pin.

Now I’m going to sew across the top of the apron at 5/8″ and then remove the gathering threads by either gently pulling or using a seam ripper.
Fold the strap in half, wrong sides together, bringing the folded edge to just below the seam line. I do this by pinning it in place from the back and then flipping it over to the front and re-pinning it.

I want the pins on the front so I can stitch-in-the-ditch on the front side of the apron and still be able to remove the pins.
Stitch-in-the-ditch is when you sew as close as you possibly can to a folded edge, so it feels like you’re sewing in a ditch, hence the name. It can be a bit time-consuming but you end up with this beautifully invisible stitch so I don’t mind taking the time to pin and repin to get everything lined up.

Now it’s back over to the waist tie.
Folding the tie in half length-wise I’m going to match the raw and folded edges from one corner through to about 4″ from the apron body. Then sew across with a 3/8″ seam allowance.

Clip the corners and turn right-side out, so now it’ll look something like this

Now to give this an extra little bit of oomph I’m going to iron it flat and then do one last line of stitching down the entire edge of the tie along the seamed edge.

This last line of stitching will help to prevent the tie from rolling in the wash and will give it a bit more wear.
With one little kid tugging on my skirts and another on the way I know I need as much extra strength in my seams as I can get.

And that’s it!
One finished classic waist-tie style apron. Friendly for pregnancy and very much multi-purpose afterward.
As a bonus, it matches the one I made for Beansprout!
What do you think?
What’s your favorite apron style? Have you made a waist-tie apron before?
Comment below and let me know!
And if this was all a bit over your head but you’re interested in learning to sew then keep an eye out for a series I’m calling “Sew you Want to Sew” which will start with ‘how to thread a needle’ and take you all the way into ‘intro to quilting’.