Save Money and Be Sustainable – Make-at-Home Pots for Seed Starting
I love a good diy project, especially when it uses things I already have at home! So when all my seeds germinated this year and I found myself in need of nursery pots on a budget I went looking for ideas and here’s what I found – three quick and easy DIY biodegradable nursery pots you can make at home.
Nursery Pots

Nursery pots are the plastic pots that seedlings generally come in if you’re buying from a nursery or a box store. Nursery pots can be square or round and come with accompanying trays for easy transport.
The benefit to using these classic plastic options (besides the super handy tray) is that they can be washed and reused year after year. The benefit of a biodegradable pot (besides biodegradability) is that you can plant the whole thing into your garden once the seedling is ready. No stress!
The choice to go with plastic or biodegradable depends on the plant and personal preference. In my case budget was the deciding factor so DIY was a necessity, I can’t make plastic so biodegradable it was.
I tried three different pot-making methods; toilet paper tubes, newspaper, and egg cartons.
1. Toilet Paper Tubes

The toilet paper tube method is great if you have toilet paper tubes on hand or if you are planting especially long seedlings.

You start by cutting four slits on one end of the tube roughly 3/4″ long and equidistant.

Then simply fold the flaps you created down.

And tape to secure!

I was able to make a lot of these very quickly but once they were filled with moist soil they got soggy quickly and were a bit hard to manage. Final score: 7/10
2. Newspaper Pots

To make newspaper pots cut strips of newspaper that are twice the width you need, fold them in half, and put the folded edge along the top of your container of choice.
I used a 10oz can and a spice jar (pictured) and was happy with the outcome for both.
Whatever container you choose to wrap you’ll want to allow about 1/2″ – 1″ of overhang on the non-folded edge.
Then simply roll your container and tape!

With the newspaper now secured into a tube around your shaping container fold the bottoms down, much like you did with the toilet paper tubes, and tape to secure.

At this point, you’ve got a perfectly functional little pot! But if it’s a bit too tall for your liking…

You can fold the top down and in to adjust the height a bit and give some extra strength to the lip.
The newspaper pots were the most time-intensive option that I tried but were still comfortably quick to make. I was also pleasantly surprised to find that they hold up better than the toilet paper tubes against moisture.
Between the endless range of sizing options and their resilience to water, I’m giving the newspaper pots a final score of 9/10.
3. Egg Cartons

Another potting option that requires you to have a hoarding tendency toward paper goods.
Arguably the easiest of the three methods I tried it does have the drawback of being utterly useless if your local grocery store only sells eggs in styrofoam.

To make egg carton pots I cut the tops and bottoms off of my egg cartons and then filled them with dirt.

The obvious drawback is that these are tiny little pockets of dirt and won’t allow much space for roots to develop. The trade-off is that you do get a dozen little pockets per carton.
I used mine for lettuce and flowers, both of which I’ll probably end up direct sowing instead, final score 4/10.
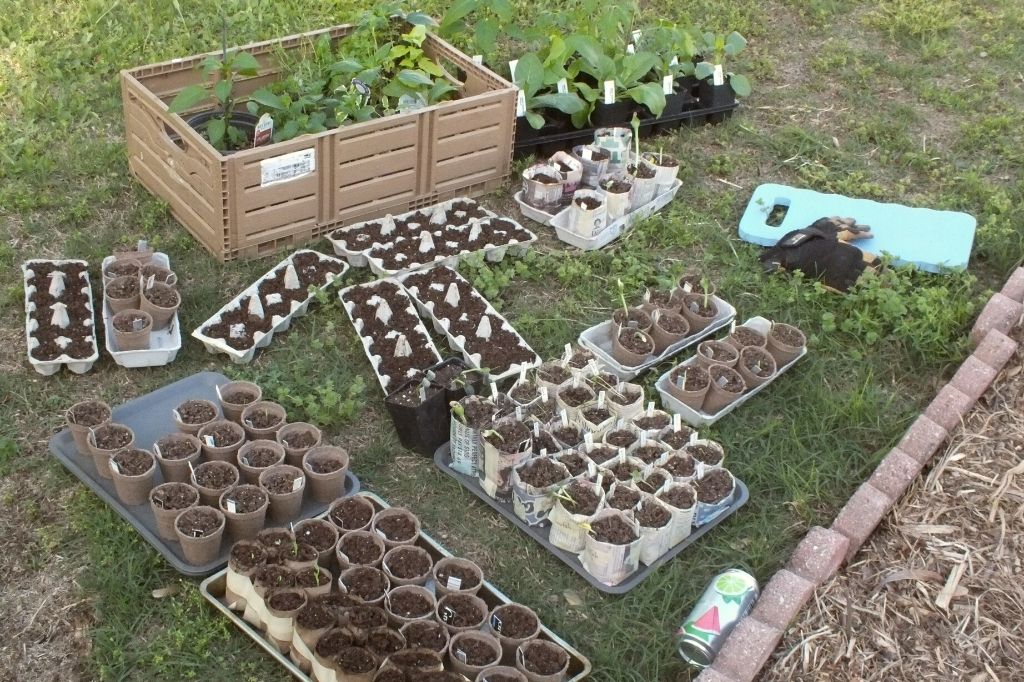
Results!

The toilet paper tube pots are all a bit lopsided and have been taped together in groups of six for added support. The seeds don’t seem to mind however and are sprouting just fine.


All the newspaper pots continue to hold up well against light watering and my sprouts are happy in both sizes, the pumpkins especially are doing great.

The egg carton seeds had a quick surge of sprouting…and then dying off.
I’m not prepared to blame that entirely on the cartons since I messed up on basically every aspect of the germinating seeds-to-seedlings process. (I’m learning, it’s to be expected).
On the other hand, the majority of seeds that didn’t make it through were in egg cartons, so, eh?

If nothing else the tops of the egg cartons make wonderful trays for the handful of store-bought biodegradable pots I scored at the dollar tree.


All told I’m pretty happy with the results!
My original plan this year was to direct sow, which may well still happen, but here I am. Haha.
Next year I’ll be trying to start all my plants from seeds (much much) earlier in the season and I’ll be opting for plastic pots.
If you’re looking for a quick, budget-friendly, option on short notice though I think the DIY route is the way to go!
Edit: 05/03/2022
Of the three options, the newspaper pots had a significantly higher rate of mold growth after a week than either the toilet paper tubes or the egg cartons. So a heads up about that, but it may have been caused by my dirt.
What do you think?
What’s your preference between plastic and biodegradable? Have you tried using DIY pots before?
Comment below and let me know!
To hear more about my germinating adventures from our first year of urban homesteading, and for instructions on how to do germinate with nothing but a paper towel, check out my post Germinating for Seedlings